What is DISM Command?
Are you experiencing issues with your Windows operating system 8, 8.1, 10, or 11, such as blue screens, unexpected application crashes, or utilities or functions that don’t work? DISM (Deployment Image Servicing and Management) is the windows inbuilt command-line tool to fix corrupted or damaged Windows operating system files and features directly from Windows online servers. It is used for both online (currently running operating system) and offline Windows images in a .wim, .vhd, or .vhdx format to fix the issues. DISM is accessed via the command line and Windows PowerShell. System administrators also utilize the DISM utility for servicing, migrating, and creating new images, particularly during Windows PE (Preinstallation Environment), Windows RE (Recovery Environment), and Windows Setup. After being first introduced in Windows 8 and Windows Server 2012 R2 in 2012, DISM is now a part of all Microsoft operating systems running the most recent version. Another program for fixing corrupted Windows files is System File Checker (sfc.exe); however, it compares corrupted files to the system’s saved .wim store; if the latter is corrupt, SFC might not be able to fix the issues. DISM tool overcomes this issue. Based on parent copies kept on Microsoft’s update servers, it can scan and repair the .wim store. In the following section, we will take a look at some DISM commands and their practical application with PowerShell and Windows command line to scan and debug the Windows operating system:
How to Run DISM Utility through Command Prompt
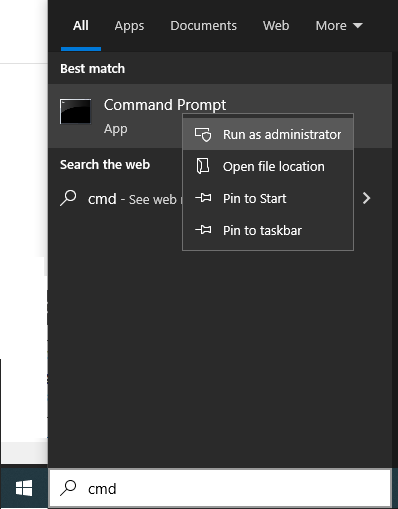
You can use the command line to launch the DISM tool and check and fix Windows for errors: As demonstrated below, right-click the command prompt and choose “Run as Administrator“: To use the DISM command line program, you must be an administrator. The part below shows us how to use multiple DISM commands to scan and fix windows issues.
How to Repair Windows 10 using DISM?
DISM uses three significant parameters to scan, inspect, and repair a broken or corrupted Windows image, and those are: ScanHealth, CheckHealth, and RestoreHealth. There are two more inputs used in conjunction with the commands above for extensive checking is Cleanup-image for extensive checking and Online for checking the running operating system.
How to Use DISM CheckHealth Command?
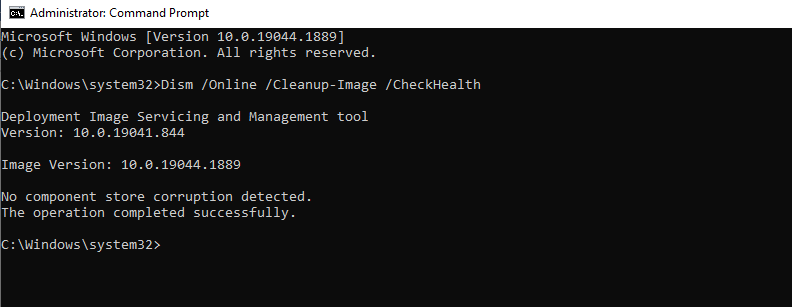
The CheckHealth argument launches the fundamental check for corruption in the component store. It operates quickly and only searches for mistakes that have already been part of the log file. This command scans a portion of the component store. The component store tracks and maintains every component that makes up the Windows operating system. To run CheckHealth online, type the following at the command prompt and enter. Following the completion of the scan, the window shown below will appear:
How to use DISM ScanHealth Command?
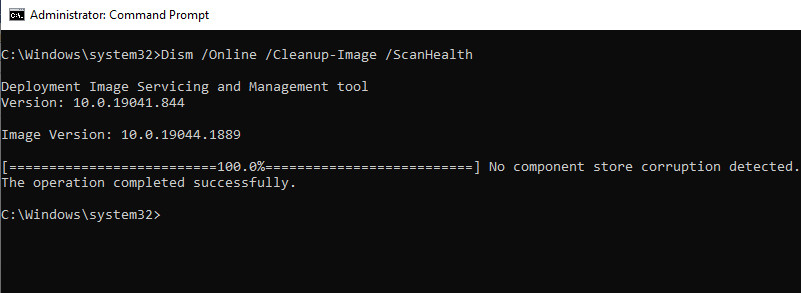
ScanHealth requires more time than CheckHealth because it thoroughly scans the component store for corruption. The time it takes to finish checking the Windows component store will depend on how well your Windows 10 operating system is doing. Run the following command from the command prompt to begin the scan: After completing the scan, the window shown below will appear: ScanHealth examines individual components for corruption in the component store by comparing the hash value of the current file to a stored hash value which is why Scanhealth generally takes longer to scan than CheckHealth. Additionally, a log file is produced, which can be used for failure analysis. In the event of a loss, first, check the DISM.log file for particular issues. Examine the Sessions.xml log file next, followed by the CBS.log file.
How to Use DISM RestoreHealth Command?
RestoreHealth is the third most crucial DISM parameter after CheckHealth and ScanHealth. It is used with DISM to repair the windows image either online or office using different source files. The following Restorehealth command is used to repair the online operating system: DISM uses Windows Update to get the necessary files to fix corruptions when you perform this command. Depending on the extent of deterioration, scanning and restoring the Component Store may take a while. From Windows Update servers, DISM will automatically download and replace the files of damaged or missing components. When the command is finished, the following screen appears:
Offline Repairing of the Windows Images
The above-explained DISM commands are for online, for the current running windows operating system. The addition and deletion of updates, drivers, language packs, and other configuration tasks can all be handled offline via DISM. Now we will see how DISM is used to fix offline windows files. To perform an offline operation, you can utilize bootable install discs, Windows 10 ISO files, or locally stored source files like “install.wim” or “install.esd” files from another device and mount as a drive. Before proceeding, check that the files match the version, edition, and language of the Windows 10 version that needs fixing. Let’s look at one example of how to use the DISM command prompt to fix an offline image. To fix an offline image, run the DISM command listed below from the command prompt: The source location needs to be changed per your offline image, and it’s usually a WIM, VHD, or VHDX file. LimitAccess tells DISM not to check Windows Update or Windows Server Update Services for source files.
How to Run DISM Utility through PowerShell?
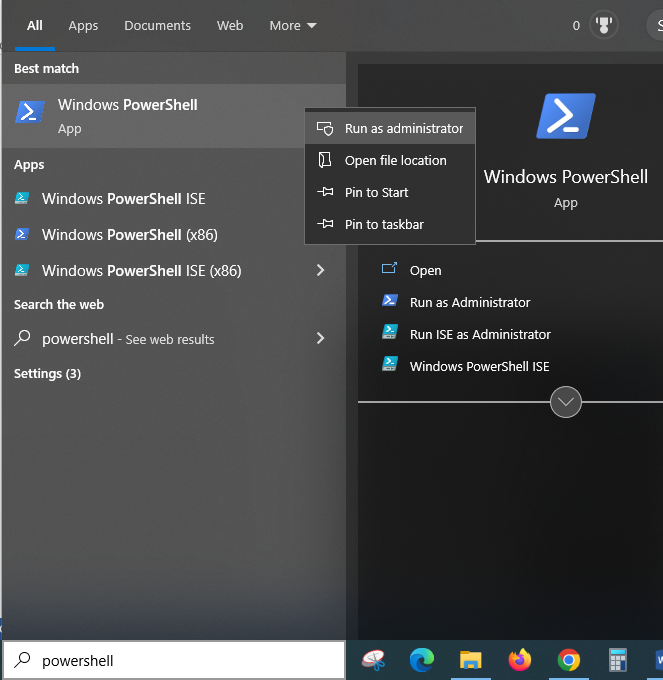
In the sections above, we looked at using the Windows command-line tool to scan for, identify, and resolve operating system issues. However, the same operations can be completed using the Windows PowerShell Cmdlets. Type the PowerShell command in the search box and run it with administrator rights as indicated in the below screenshot to access PowerShell Cmdlets. The cmdlets of the DISM PowerShell frequently match the arguments in Dism.exe directly. You can obtain the entire table of all DISM commands along with their PowerShell cmdlet equivalents from the Microsoft website. To view related syntax, switches, and parameters, use the PowerShell help command “get-help – examples.“ Some of the commands used in PowerShell are
For CheckHealth: Repair-WindowsImage -CheckHealth For ScanHealth: Repair-WindowsImage -ScanHealth For RestoreHealth: Repair-WindowsImage -RestoreHealth
Examples of how to use PowerShell to perform the DISM command
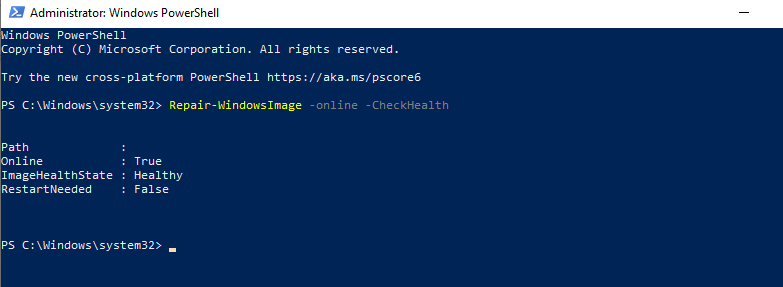
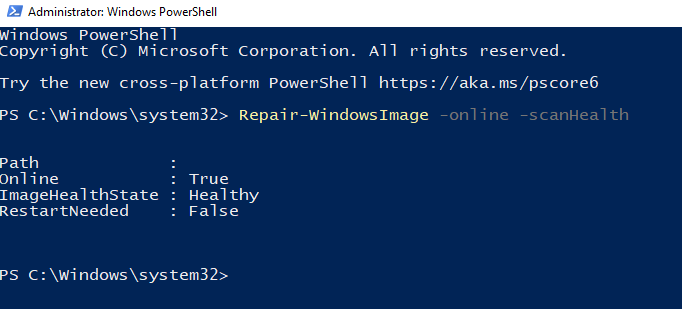
Type the following to launch the CheckHealth Powershell cmdlets. After the completion of the command, the below screen will appear: You can use the ScanHealth Powershell cmdlets to perform thorough checking and repairing as follows: The following screen will appear after running the command successfully. Please be aware that you must have administrative rights to perform these commands; otherwise, you will receive the error message “The requested operation requires elevation,” and the DISM command won’t work. You may find all the information on PowerShell’s cmdlets module on this Microsoft page.
DISM Error Troubleshooting
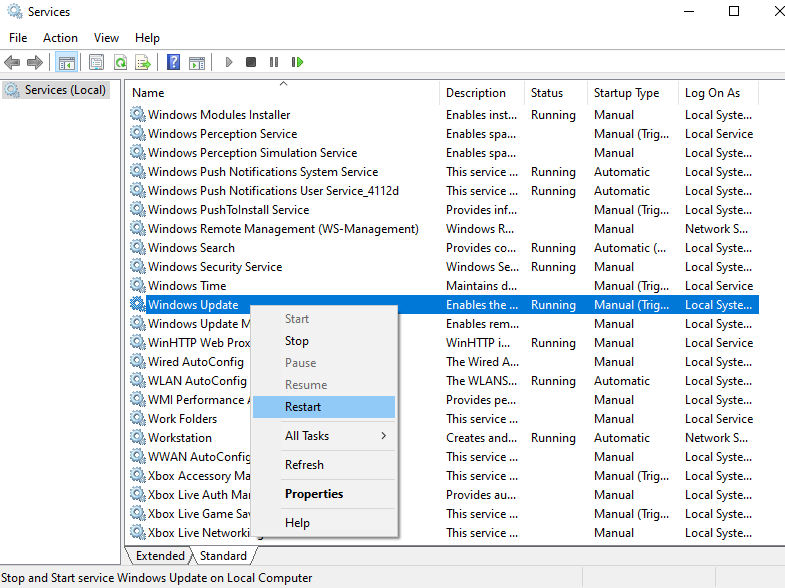
The goal of DISM is to scan and repair the operating system automatically. But occasionally, it might fail. The section will highlight some common errors you may encounter while running the DISM utility. Error: 0x800f0954 – DISM failed. No operation was performed. This error is a common problem that arises when the DISM command fails. This error occurs when a third-party antivirus program interferes with the DISM during command execution. Active Proxy, windows update services, read-only access install.wim etc. can also create this error. Let’s look at how to overcome these challenges so that the DISM runs successfully. Interference of Antivirus program Solution: If the error still occurs after stopping the antivirus, you can uninstall and reinstall it after the DISM function completion. There is no need for a third-party antivirus because Microsoft Defender is a powerful antivirus with Windows 10. Corrupted Windows update components and registry. When the background intelligent transfer service (BITS), cryptographic services (CryptSvc), and windows update services are misconfigured, DISM fails. Solution: These services must have an Automated Startup type and Start Status to run an automatic Windows update successfully. Occasionally, restarting these services would also cure the problem: Disabling proxy You may use a proxy to maintain your privacy, which stops DISM from running the command. Solution: The solution is to turn off the proxy and run the DISM tool. Read-only access to Install.wim Most of the time, a file install.wim is copied directly from the Windows 10 installation ISO to start the DISM offline scan. Because the install.wim file has read-only access, DISM fails. Solution: Remove the read-only permissions by navigating to the Read-only box by selecting Properties from the context menu when you right-click the install.wim file.
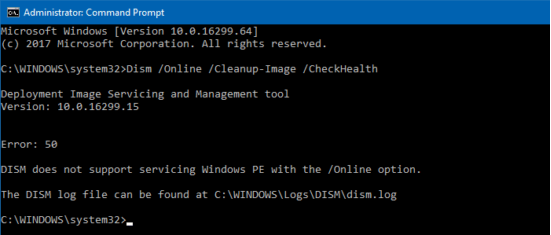
How to fix DISM error 50
DISM error 50 is another typical error type. It occurs when the user is trying to run one of the following commands:
Dism /Online /Cleanup-Image /CheckHealth Dism /Online /Cleanup-Image /ScanHealth Dism /Online /Cleanup-Image /RestoreHealth
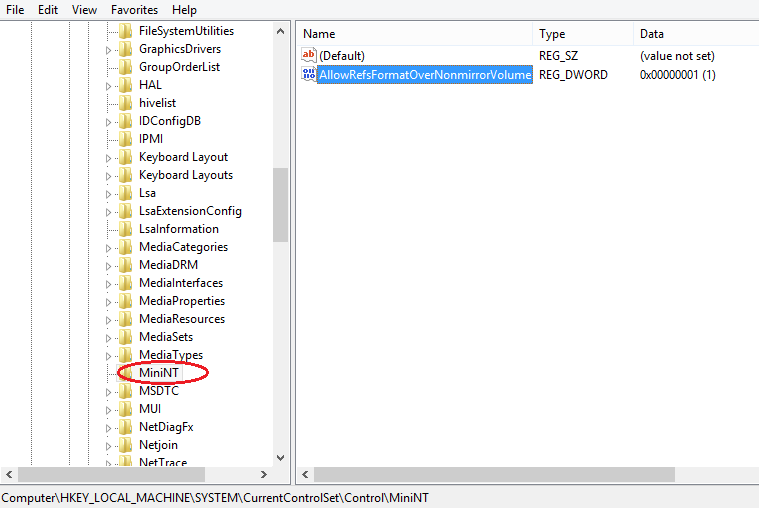
The leading cause for this error is because of a misplaced registry key. Therefore, to correct this problem, you must delete this key as follows: Using the command prompt, run Regedit to access the registry. Navigate to HKEY_LOCAL_MACHINESYSTEMCurrentControlSetControl. Afterward, find the MiniNT folder and remove it, as indicated in the figure below. Restart your Windows 10 computer after verifying your modifications.
Conclusion
The DISM tool is a versatile and cutting-edge tool that experts may utilize with technical backgrounds. It is ideal for system administrators. The sophisticated tool resolves component store corruption that SFC and CHKDSK cannot manage to repair operating system issues. You may also explore some best repair tools to solve Windows 10 problems automatically.

